Notebooks: part 1, exploring Jupyter
During lockdown I’ve heard a lot about Notebooks. The idea is to have a single
page containing some pieces of code, their output, and some related text/images.
I don’t think I’m alone in having scraps of PowerShell and associated results / notes in OneNote, in emails,
and in PS1 files with large comment blocks, or even deep in my command history. Compound documents that can run code in-situ would be neater.
And running commands that you’d run at the prompt and capturing the results with some notes looks like a useful way to put togeteher training materials for
command line tools like git.
All blocks of code in the same notebook run in the same environment to allow each to access results from the others. So any notebook implementation must process and display the compound document and manage an execution environment which persists until the notebook is closed. There are multiple ways to do this; Jupyter is probably the leading one which is where I stated. Jupyter also defines the most widely used file format, .ipynb which is a JSON file under the covers. I’m used to the OneNote usage of “Notebook” for something with many pages, grouped into sections. Each Jupyter notebook is a single page, so multi-page creations would need directories and subdirectories.
Jupyter began as Interactive Python (hence the I Py part of the file name) and
Wikipedia explains the name is
a reference to its core languages (Julia, Python and R). It allows additional
language Kernels to be added and .NET languages (C#, F#, and PowerShell) are
available in an add-on Kernel.
It takes two software installations (one for Jupyter and one for .NET) and
two command lines to make it everything work
-
Step 1 Go to https://dotnet.microsoft.com/download, under .NET Core 3.1 click Download .NET Core SDK,** then Install the package, all the defaults are fine.
-
Step 2 You need a version of Python with Jupyter support. The simplest way to get it is to go to https://www.anaconda.com/products/individual, click download; I chose Windows\64Bit GUI Installer. Like the .NET SDK, it’s fine to install Anaconda with the all the defaults, but I did select install for all users. There are other slimmer installs which will get you to the same point – if you have time but are very short on space, you can explore those.
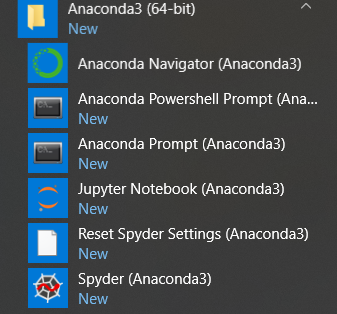 Anaconda added these items to my Programs menu
Clicking Jupyter Notebook at this point would start a local web server which handles sending code into an appropriate engine and updating and rendering the ipynb with HTML and javascript for display in a browser. At this point Jupyter only knows about Python and step 3 is to add .NET interactive as follows.
-
Click “Anaconda PowerShell prompt”. which is Windows PowerShell with a start-up command to activate Anaconda
- Optionally, you can list the kernels which Jupyter knows about:
> jupyter kernelspec list Available kernels: python3 C:\\ProgramData\\Anaconda3\\share\\jupyter\\kernels\\python3 -
To add the kernels for C#, F# and PowerShell to the system run
dotnet tool install --global Microsoft.dotnet-interactive
Which should end with the message
Tool 'microsoft.dotnet-interactive' (version 'x.y.z') was successfully installed -
The 3 kernels can be called from multiple places, to allow Jupyter to use them, run
dotnet interactive jupyter install
Each kernel is installed in turn and should produce a message
.NET kernel installation succeeded - Optionally you can ask for a list of Kernels, which should now should now show 4
>jupyter kernelspec list`

Available kernels:
.net-csharp
C:\Users\James\AppData\Roaming\jupyter\kernels\.net-csharp
.net-fsharp
C:\Users\James\AppData\Roaming\jupyter\kernels\.net-fsharp
.net-powershell
C:\Users\James\AppData\Roaming\jupyter\kernels\.net-powershell
python3 C:\ProgramData\Anaconda3\share\jupyter\kernels\python3
Now a click on Jupyter notebook from the start menu will start a console window, which displays instructions about how to stop the service and how navigate to it (it listens on port 8888 or the next available one and uses a token to prevent stray users connecting). Usually you don’t need to do either of these - the launch navigates to the web page, where the Quit button will shut the service down. The page it opened for me looked like this:
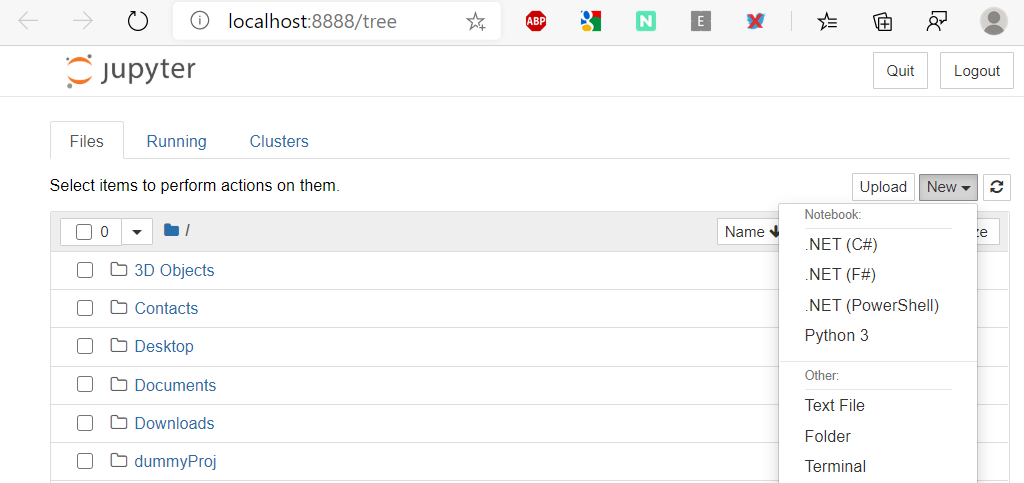
It lists the contents of my home directory – which is treated as the default
root directory for the web service. The start menu Icon is equivalent to running
jupyter notebook $env:userprofile at the Anaconda PowerShell prompt.
The command can take either a folder name or the name or an ipynb file, and the icon can be changed to a more suitable directory.
Each instance of the server creates files under
\userProfile\AppData\Roaming\jupyter\runtime.
These include the HTML file used to launch the web page for each instance and JSON which describes the connections. The command
jupyter notebook list will interrogate these files to list the running servers and the command
jupyter notebook stop 8888 will stop the server running on a given port. If the server is not stopped
cleanly – either from console window, or by clicking on the Quit button in the browser, you may need to clean up these files.
From the browser UI, you can open a pre-existing notebook file or start a new one from the New button and choose a Kernel - .NET (Powershell) in my case. The new notebook starts with one code cell, and from there it’s just a case of entering anything one might enter in PowerShell and running it [shift] + [Enter]
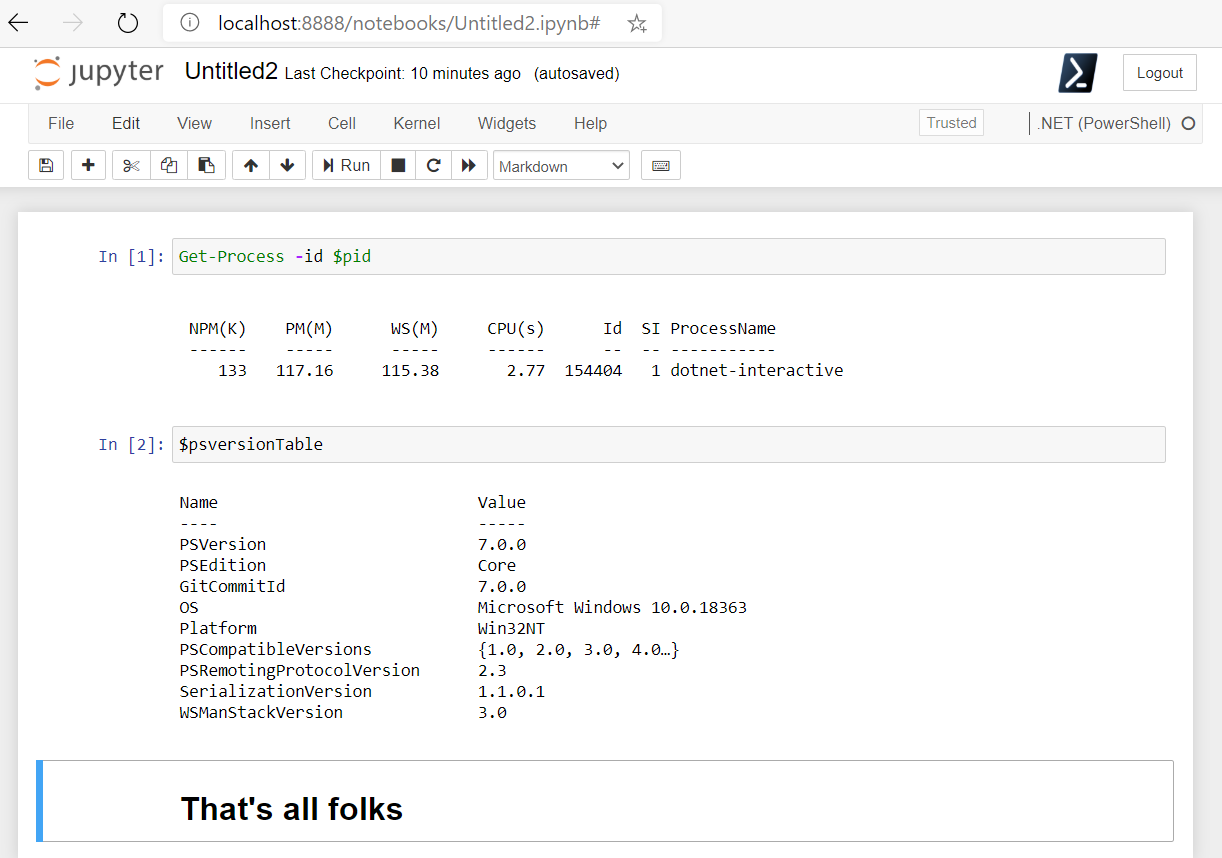
In the example above you can see the how the output of each piece of code is
inserted. The first block shows PowerShell is not running as pwsh.exe or
PowerShell.exe but inside dotnet-interactive. The second shows this version
shipped with PowerShell 7.0.0 so is a little behind pwsh on my machine.
To the left of each code block Jupyter displays its history number. Toggling between code and markdown in the cells – as in the last cell above – is done from Jupyter’s, Cell menu and its File menu lets you download just the PowerShell, or the whole formatted page (though you may need to install extra components for some formats). It will also generate a “print preview” version which will print nicely from the browser.
The Jupyter logo goes [back] to the directory view (important if you’re asking “how do I quit”)
Exploring the PowerShell modules available shows that the dotnet interactive
includes a module of its own, with extra tricks to use Ploty which is commonly
used for charting in notebooks. It also has an Out-Display command and with a
little fiddling I found I could output HTML or SVG graphics into the notebook. Markdown supports images - it took me a little time to work out what was valid as a path and what wasn’t.
The Python extension for Visual Studio Code will also open an ipynb file; it handles starting the web server and processes the information which comes back: (you may need to go to the VS Code command palette and choose Python: Select Interpreter for Jupyter server first). Unsurprisingly this is designed for Python and some features don’t work with dotnet interactive notebooks.
Looking at code took me into some further areas which I’ll look at in part 2