PowerShell and the Microsoft Graph API : Part 1, signing in
I recently I wanted a script to be able to post results to Microsoft teams, which led me to the Microsoft Graph API which is the way to interact with all kinds of Microsoft Cloud services, and the scope grew to take in OneNote, OneDrive, SharePoint, Mail, Contacts, Calendars and Planner as well. I have now put V1.0 onto the PowerShell Gallery , and this is the first post on stuff that has come out of it.
If you’ve looked at anything to do with the Microsoft Graph API, a lot of things
say “It uses OAuth, and here’s how to logon”. Every example seems to log on in a
different way (and the authors seem to think everyone knows all about
OAuth). So, I present… fanfare … my ‘definitive’ guide to logging on.
Even if you just take the code I’ve shared, bookmark this because at some point
someone will say What’s Oauth about? The best way to answer that question
is with another question: How can a user of a service allow something to
interact with parts of that service on their behalf? My old WordPress blog had a
share facility allowing WordPress to tweet on a reader’s behalf. It wasn’t
necessary to give WordPress my Twitter credentials, but I told Twitter “I want
WordPress to be able to tweet for me”. There is a scope of things at Twitter which I
delegate to WordPress. Some of the building blocks are
- Registering the applications and services which permission will be delegated to, and giving them a unique ID; this allows users to say, “This may do that”, “Cancel access for that” – rogue apps can be de-registered and so on.
- Authenticating the user (once) and obtaining and storing their consent for delegation of some scope.
- Sending tokens to delegates – WordPress sends me to Twitter with its ID; I have a conversation with Twitter, which ends with “give this to WordPress”.
Tokens help when a service uses a REST API, with self-contained calls. WordPress tells Twitter “Tweet this” with an access token which says who approved it to post. The access token is time limited and a refresh token can extend access without involving the user (if the user agrees that the delegate should be allowed to work like that).
Azure AD adds extra possibilities and combined with “Microsoft Accounts”, Microsoft Graph logons have a lot of permutations.
-
The application directs users to a web login dialog, and they log on with a “Microsoft Account” from any domain which is not managed by Office 365 (like Gmail or Outlook.com). The URI for the login page includes the app’s ID and the scopes it needs; and if the app does not have consent for those scopes and that user, a consent dialog is displayed for the user to agree (or not). If the logon is completed, a code is sent back. The application presents the code to a server and identifies itself and gets the token(s). Sending codes means users don’t hold their own tokens or pass them over insecure links.
-
From the same URI as option 1, the user logs on with an Azure AD account a.k.a. an Office 365 “Work or school” account; Azure AD validates the user’s credentials, and checks if there is consent for that app to use those scopes. Azure AD tracks applications (which we’ll come back to in a minute) and administrators may ‘pre-consent’ to an application’s use of particular scopes, so their users don’t need to complete the consent dialog. Some scopes in Microsoft Graph must be unlocked by an administrator before they can appear in a consent dialog
 For options 1 & 2 where the same application can be used by users with either Microsoft or Azure-AD accounts,
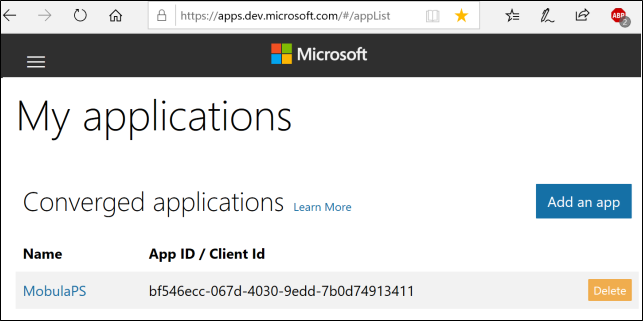
applications are registered at https://apps.dev.microsoft.com/ (see left). The application ID here can be used in a PowerShell script.
For options 1 & 2 where the same application can be used by users with either Microsoft or Azure-AD accounts,
applications are registered at https://apps.dev.microsoft.com/ (see left). The application ID here can be used in a PowerShell script.Azure AD learns about these apps as they are used and shows them in the enterprise applications section of the Azure Active Directory Admin Center.
 The name and the GUID from the App registration site
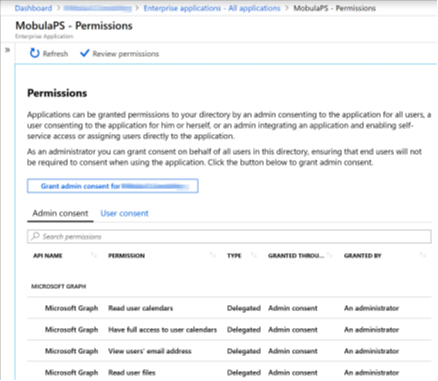
appear in Azure and clicking through shows some information about the app and
leads to its permissions. (See right)
The name and the GUID from the App registration site
appear in Azure and clicking through shows some information about the app and
leads to its permissions. (See right)The Admin Consent / User consent tabs in the middle allow us to see where individual users have given access to scopes from a consent dialog or to see and change the administrative consent for all users in that Azure AD tenant.
The ability for the administrator to pre-consent is particularly useful with some of the later scenarios, which use a different kind of App, which leads to the next option…
- The App calls up the same web logon dialog as the first two options except
the logon web page is tied to specific Azure AD tenant and doesn’t allow
Microsoft accounts (from unmanaged domains) to log on. The only thing which has changed between
options 2 and 3 is the application ID in the URI.
This kind of logon is associated with an app which was not registered at https://apps.dev.microsoft.com/ but from the App Registrations section of the Azure Active Directory Admin Center. An app registered there is only known to one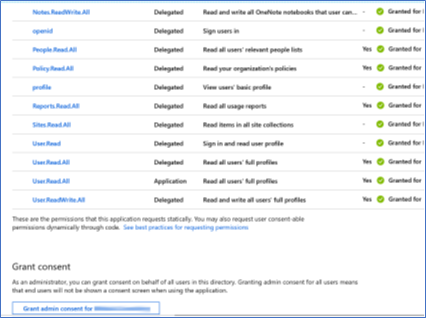 AAD tenant so when the general-purpose logon page is told it is using that app, it adapts its behaviour.
Registered apps have their own Permissions page, similar to the one for enterprise apps; you can see the scopes which need admin consent (“Yes” appears towards the right). - When Azure AD stores the permitted Scopes for an App, there is no need to interact with the user (unless we are using multi-factor authentication) and the user’s credentials can go in a silent HTTPS request. This calls a different logon URI with the tenant identity embedded in it – the app ID is specific to the tenant and if you have the app ID then you have the tenant ID or domain name to use in the login URI.
- All the cases up to now have been delegating permissions on behalf of a
user, but permissions can be granted to an Azure AD application itself
(in the screen shot on the right
user.read.allis granted as a delegated permission and as an Application Permission). The app authenticates itself with a secret which is created for it in the Registered Apps part of the Azure AD admin Center. The combination of App ID and Secret is effectively a login credential and needs to be treated like one.
Picking how an app logs on requires some thought.
| Decision | Result | Options |
|---|---|---|
| Will it work with “Live” users’ Calendars, OneDrive, OneNote? | It must be a General app and use the Web UI to logon. | 1 or 2 |
| Is all its functionality Azure AD/Office 365 only (like Teams) ?or is the audience Office 365 users only ? | It can be either a General or Azure AD App, (if general is used, Web UI must be used to logon). | 1-4 |
| Do we want users to give consent for the app to do its work ? | It must use the Web UI. | 1-3 |
| Do we want to avoid the consent dialog ? | It must be an Azure AD app and use a ‘Silent’ http call to the Tennant-specific logon URI. | 4 |
| Do we want to logon as the app rather than a user ? | It must be an Azure AD app and use a ‘Silent’ http call to the Tennant-specific logon URI. | 5 |
Usually when you read about something which uses graph, the author doesn’t explain how they selected a logon method – or that other ways exist. For example, the Exchange Team Blog has a step-by-step example for an app which logs on as itself. (Option 5 above). The app is implemented in PowerShell and the logon code the boils down to this:
    $tenant    = 'GUID OR Domain Name'
    $appId     = 'APP GUID'
    $appSecret = 'From Certificates and Secrets'
    $URI       = 'https://login.microsoft.com/{0}/oauth2/token' -f $tenant
    $oauthAPP  = Invoke-RestMethod -Method Post -Uri $URI -Body @{
        grant_type      = 'client_credentials';
        client_id       = $appid ;
        client_secret   = $appSecret;
        resource        = 'https://graph.microsoft.com';
    }
After this runs $oauthApp has an access_token property which can be used in all
the calls to the service.
For ease of reading here the URI is stored in a variable, and the Body parameter
is split over multiple lines, but the Invoke-RestMethod command could be a
single line containing the URI with the body on one line
Logging on as the app is great for logs (which is what that article is
about) but not for “Tell me what’s on my one drive”; but that code can quickly
be adapted for a user logon as described in Option 4 above, we keep same
tenant, app ID and URI and change the grant type to password and insert the user
name and password in place of the app secret, like this:
    $cred      = Get-Credential -Message "Please enter your Office 365 Credentials"
        $oauthUser = Invoke-RestMethod -Method Post -Uri $uri -Body @{
        grant_type = 'password';
        client_id  = $clientID;
        username   = $cred.username;
        password   = $cred.GetNetworkCredential().Password;
        resource   = 'https://graph.microsoft.com';
    }
Just as an aside, a lot of people “text-wrangle” the body of their HTTP requests, but I find it easier to see what is happening by writing a hash table with the fields and leave it to the cmdlet to sort the rest out for me; the same bytes go on the wire if you write
    $oauthUser = Invoke-RestMethod -Method Post -Uri $uri -ContentType "application/x-www-form-urlencoded" `

     -body "grant_type=password&client_id=$clientID&username=$($cred.username)&password=$($cred.GetNetworkCredential().Password)&resource=https://graph.microsoft.com"
As with the first example, the object returned by Invoke-RestMethod, has the
access token as a property so we can do something like this
    $defaultheader = @{'Authorization' = "bearer $($oauthUser.access_token)"}
    Invoke-RestMethod -Method Get -Uri https://graph.microsoft.com/v1.0/me -Header $defaultHeader
I like this method, because it’s simple, has no dependencies on other code, and runs in both Windows-PowerShell and PowerShell-core (even on Linux).
But it won’t work with consumer accounts. A while back I wrote something which built on this example from the hey scripting guy blog which displays a web logon dialog from PowerShell; the login URI which the original connected to was only good for Windows Live logins – different examples you find will use different end points – this page gave me replacement ones which seem to work for everything .
With $ClientID defined as before and a list of scopes in $Scope the code looks
like this
    Add-Type -AssemblyName System.Windows.Forms
    $CallBackUri = "https://login.microsoftonline.com/common/oauth2/nativeclient"
    $tokenUri    = "https://login.microsoftonline.com/common/oauth2/v2.0/token"
    $AuthUri     = 'https://login.microsoftonline.com/common/oauth2/v2.0/authorize' + '?client_id=' + $ClientID +
                        '&scope=' + ($Scope -join '%20') +  '&redirect_uri=' + $CallBackUri + '&response_type=code'
    $form        = New-Object -TypeName System.Windows.Forms.Form -Property @{Width=1000;Height=900}
     $web        = New-Object -TypeName System.Windows.Forms.WebBrowser -Property @{Width=900;Height=800;Url=$AuthUri }
    $DocComp = {
        $Script:uri = $web.Url.AbsoluteUri
        if ($Script:Uri -match "error=[^&]*|code=[^&]*") {$form.Close() }
    }
    $web.Add_DocumentCompleted($DocComp) #Add the event handler to the web control

    $form.Controls.Add($web) #Add the control to the form

    $form.Add_Shown({$form.Activate()})
    $form.ShowDialog() | Out-Null
    if ($uri -match "error=([^&]*)") {
            Write-Warning (“Logon returned an error of “ + $Matches[1])
            Return
    }
    elseif ($Uri -match "code=([^&]*)" ) {# If we got a code, swap it for a token

        $oauthUser = Invoke-RestMethod -Method Post -Uri $tokenUri -Body @{
                'grant_type'   = 'authorization_code'
                'code'         = $Matches[1]
                'client_id'    = $Script:ClientID
                'redirect_uri' = $CallBackUri
        }
    }
This script uses Windows Forms which means it doesn’t have the same ability to
run everywhere; it defines a ‘call back’ URI, a ‘token’ URI and an
‘authorization’ URI. The browser opens at the authorization URI, after logging
on the server sends their browser to the callback URI with code=xxxxx appended to
the end; the ‘NativeClient’ page used here does nothing and displays nothing,
but the script can see the browser has navigated to somewhere which ends with
code= or error=, it can pick out the code and send it to the token URI. I’ve
built the Authorization URI in a way which is a bit laborious but easier to
read; you can see it contains list of scopes separated by spaces, which have to
be escaped to “%20” in a URI, as well as the client ID – which can be for either
a generic app (registered at apps.dev.microsoft.com) or an Azure-AD app.
The middle part of the script creates a the Windows form with a web control
which points at the authorization URI, and has a two line script block which
runs for the on_DocumentCompleted event, it knows the login process is
complete when the browser’s URI contains either a code or an error; when it sees
that, it makes the browser’s final URI available and closes the form.
When control comes back from the form the If … ElseIf checks to see if the
result was an error or a code. A code will be posted to the token granting URI
to get the Access token (and refresh token if it is allowed). A different post
to the token URI exchanges a refresh token for a new access token and a fresh
refresh token.
To test if the token is working and that a minimum set of scopes have been authorized we can run the same script as when the token was fetched silently.
    $defaultheader = @{'Authorization' = "bearer $($oauthUser.access_token)"}
    Invoke-RestMethod -Method Get -Uri https://graph.microsoft.com/v1.0/me
And that’s it.
In the next part I’ll start looking at calling the rest APIs, and what is available in Graph.