Notebooks: part 3, places to use .IPYNB files, even without Jupyter
In part one I covered installing a version of Python with the Jupyter server and adding extra Kernels – in particular .NET Interactive for PowerShell support. After a quick exchange with some friends on twitter it seems I could have explained something better in part two about the different ways .NET Interactive works with Azure Data Studio and Visual Studio Code, which is what I’m going to try to cover first.
The Jupyter server can work in two different ways. My set-up of default_anaconda_installation + .net Interactive from part 1 gives the ability to run a Jupyter server and access it through a web browser to work with notebooks stored as .ipynb files.
If Azure Data Studio (or the Python extension in VS Code) is told to open a .ipynb file it starts Python to run exactly the same web server, specifying the port and access token it should use and then it makes API-calls to use the server without a web front end. You can see this in Azure Data Studio below, and the link at the bottom will open in a browser allowing two instances of a kernel on one web server to see the same set of files. Because each client is using its own Kernel there is no interaction between code in one and code in the other.
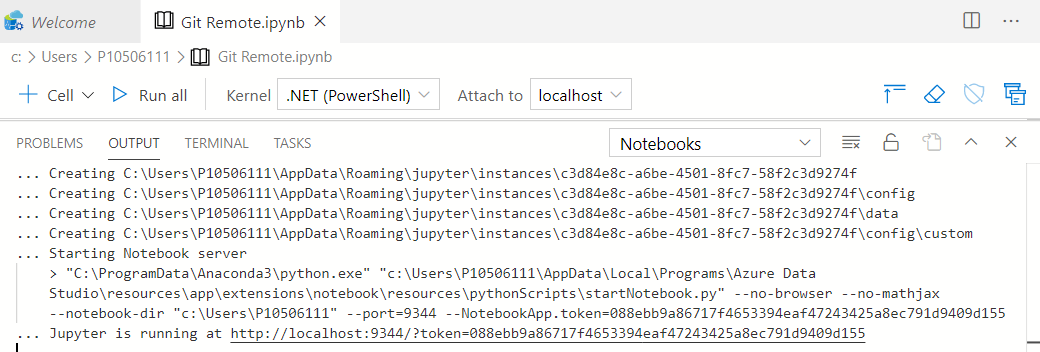
Getting the Process object for the current PowerShell process with
Get-process -id $pid and then checking its parent process, than that process’s parent and so on shows that
[Azuredatastudio] -runs- [cmd] -to launch- [python] -which runs Jupyter and starts a
kernel- [dotnet] -which hosts- [dotnet-interactive] which has PowerShell built in.
So Azure Data Studio does its own rendering but uses the Python Jupyter bits for everything else. The Jupyter Kernel for Windows PowerShell comes with Azure Data Studio, but Data Studio can use any Kernel known to Jupyter, so if you install .NET Interactive Kernels they will be usuable in Data Studio - they’re just a different installation.
I said in part 2 that the .NET interactive extension for VS code uses its own
installation – when Python launches the kernel it runs
<home>\.dotnet\tools\dotnet-interactive.exe Jupyter <parameters>.
Things are different in VS code.
[Code] -runs- [dotnet tool run <parameters>] -which runs- [dotnet <home>\.nuget\…\
Microsoft.DotNet.Interactive.App.dll <parameters>]
No Python, no Jupyter web server, it goes directly to the Kernel, loading files
from the .nuget directory instead of from the .net one.
I also referred to the difference between Jupyter-generated output and output from the DotNet-Interactive Extension for VS code (I’m tempted to start abbreviating that to DNIE pronounced like “deny”). Jupyter creates JSON inside the ipnyb file like this:
"outputs": [
    {
        "output_type": "stream",
        "name": "stdout",
        "text": [
            "Line 1",
            "Line 2",
            "Line 3"
        ]
    }
]
It’s also valid to have "text": "A long string with \n for newlines"
At the moment the extension for vs code writes like this:
"outputs": [
    {
        "output_type": "execute_result",
        "data": { "text/plain": "Line 1" }
    },
    {
        "output_type": "execute_result",
        "data": { "text/plain": "Line 2" }
    }
]
Both forms seem to be read everywhere but often the Jupyter format reads more nicely. I would stress at the moment, because, to repeat what I said in part 2, this is a preview and things can change.
Being JSON internally, lots of things can read and/or write ipynb format. A
notebook file has a metadata block which says what language it uses, and a
cells block, each cell has a type (code or markdown), source, and – for code-cells - output.
My friend Doug Finke has a PowerShell module to help work with notebooks and their content and I’ll talk more after looking at some of the other useful tools:
-
GitHub will display the contents of a .ipynb. file in read-only form -skipping any JavaScript.
-
nbviewer seems to use the same templates as git hub but doesn’t filter out the Javascript. If I run something on my computer, my results are embedded in the Notebook, and someone I share them with might not have access to my data, so being able to show a chart is a consideration.
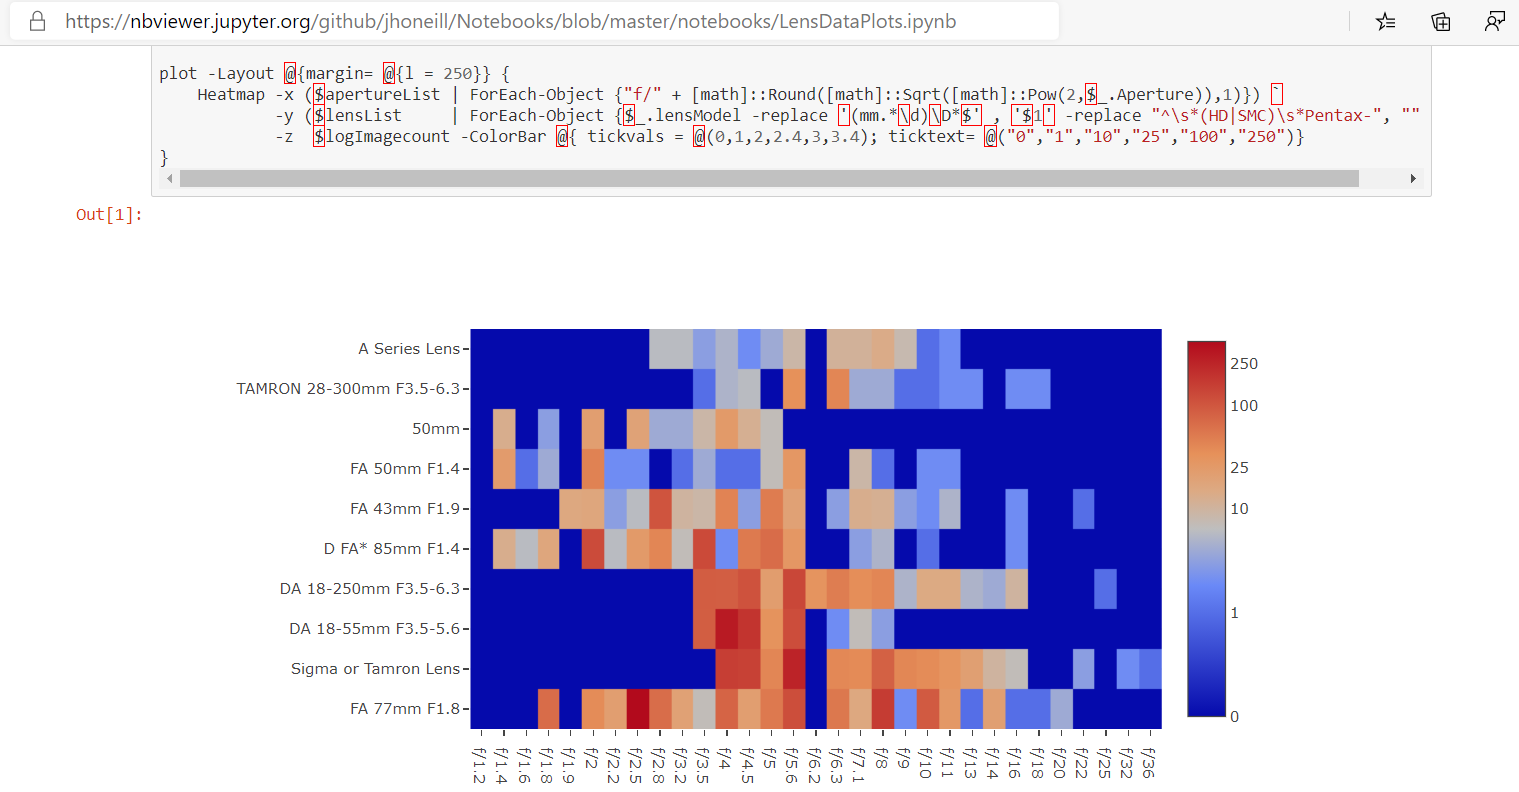
Incidentally, the screenshot above shows a notebook from my git hub repo - someone asked a question in a photography forum which led me to do a heat map of how often I use lenses / setting combinations, drawn from the Adobe LightRoom data I’ve been messing with for years. -
Binder goes even further. It gives you a docker container running the Jupiter server, and will copy information from a GitHub repo into the container for the server to use. By default, it doesn’t have the additional Kernels from .NET interactive, but you can provide a
dockerfileto configure the container – I got mine , and the associatednugetfile, from the dotnet interactive repo.
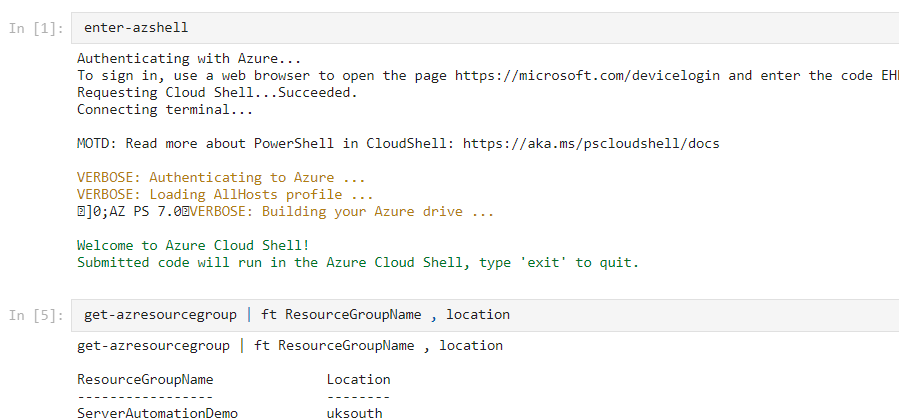
Binder can take a few moments to create and launch the container but it’s live, you can change the code and re-run it. The container doesn’t have any access to your machine (so files you need must be in the repo), but it is possible to install modules, or to connect to an Azure Cloud-Shell or to run other commands which access resources from the internet.
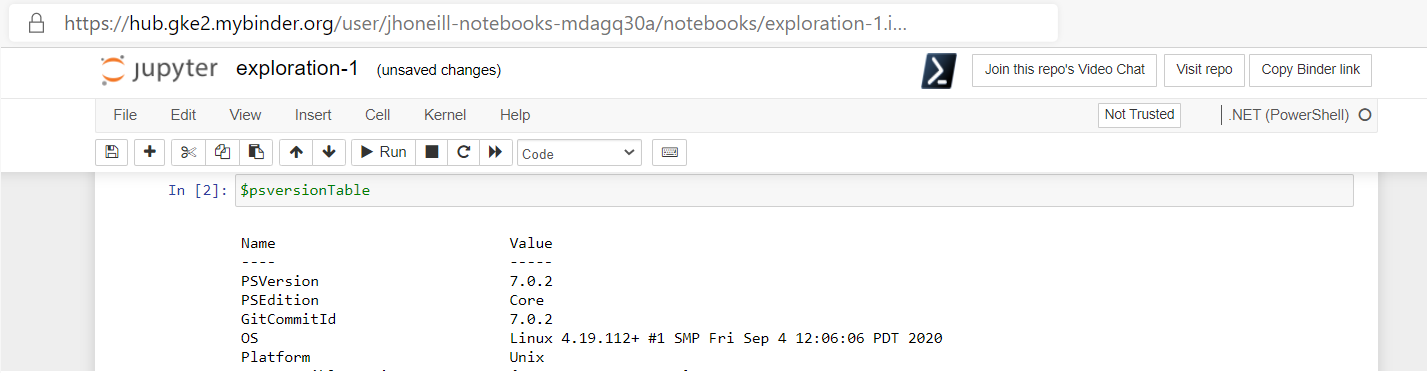
In case you weren’t aware that .NET interactive is cross platform, the screen shot above shows the docker containers for binder run it via Python on Linux. Binder disposes of the container then you leave or if you’re inactive for too long.
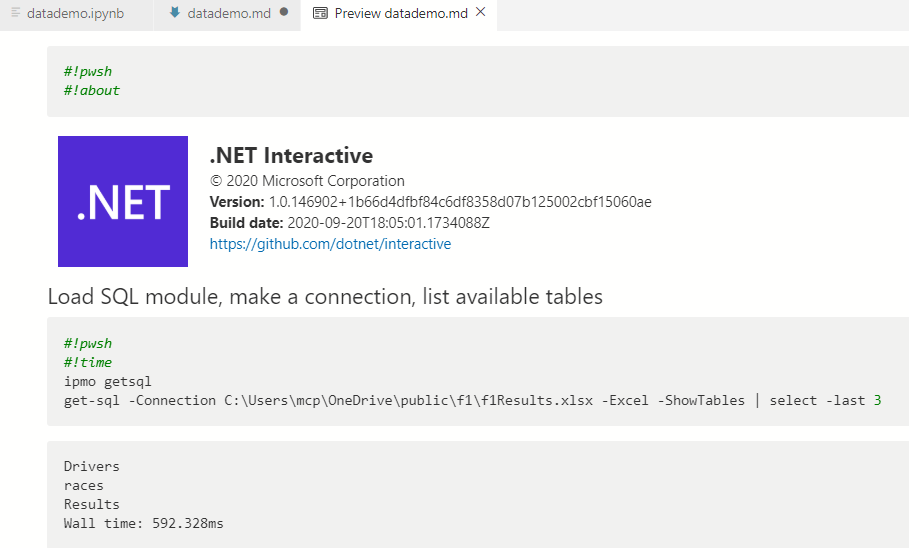
I can see shared notebooks run using a service like binder as a way to do “show your working” configuration or analysis of on-line services – and I’d pop over to Print-Preview in Jupyter to generate a nice view of what has been done, like this:
As I said before, being JSON it’s possible to fiddle with the contents of the files, and I said I would come back to Doug Finke’s PowerShell module which I have been adding to.
First: Doug has a Get-NotebookContent function which returns objects with a type property set to “Code” or
“Markdown” and a source property. It only needs a couple of lines either to
print the Markdown or to run the source of a code cell. In others words running the notebook in a normal PowerShell session. Each block might
output a different type of object and PowerShell will try to format all output based on the properties of the first object so I use Out-Default to force a re-evaluation of the properties to display. Like this:
Get-NotebookContent .\datademo.ipynb | ForEach-Object {
    if ($_.type -eq "code") {Invoke-Expression $_.Source | Out-Default }
    else                    {Write-Verbose -Verbose $_.source}
}
Doug also has a ConvertFrom-NotebookToMarkdown function and I tweaked things to let me run a command like this:
ConvertFrom-NotebookToMarkdown .\datademo.ipynb -Includeoutput
and get this
Doug also created commands which allow a new notebook to be created like this:
New-PSNotebook -NoteBookName .\TestNotebook -IncludeCodeResults {
    Add-NotebookMarkdown -markdown "# This is a H1 tag"
    Add-NotebookCode     -code     '"Hello World"'
}
-IncludeCodeResults creates a runspace to process commands while New-PSNotebook is running, and triggers the running of each source block in that runspace
and puts its output in the cells’ output fields. I made some tweaks here too – to have -Verbose show the output, and to allow the notebook to be either a
Windows PowerShell one for Azure Data Studio or to be a .NET interactive one. I catch a few of the magic commands – removing the redundant #!pwsh
if the VSCode extension has said we have a C# notebook with PowerShell cells, and processing #!About and #!Time - and I added some aliases
to make it a bit more like a domain specific language:
notebook {
    markdown $myMarkdownText
    code     $MyPSScript
} -DotNetInteractive test.ipynb
I’m not 100% that changing code from pointing to Visual-Studio code to
Add-NotebookCode is a good idea, but for now it gives me an interesting trick,
which I’ll come to in a moment. I could combine the last example above with the
one to run code from the notebook and make something like this:
notebook {
    switch (NotebookContent .\datademo.ipynb) {
        { $_.Type -eq 'markdown' } { markdown $_.Source }
        { $_.Type -eq 'code'     } { code     $_.Source -Verbose }
    }
} -IncludeCodeResults -DotNetInteractive dd2.ipynb
The trick I mentioned is this: since I am running (via aliases) markdown if the
type field holds “markdown” and code if it holds “code” I could remove the
switch statement
notebook {
    NotebookContent .\datademo.ipynb | foreach {
        & $_.Type $_.Source -Verbose
    }
} -IncludeCodeResults -DNI new.ipynb
Either gives me a notebook like the one below.
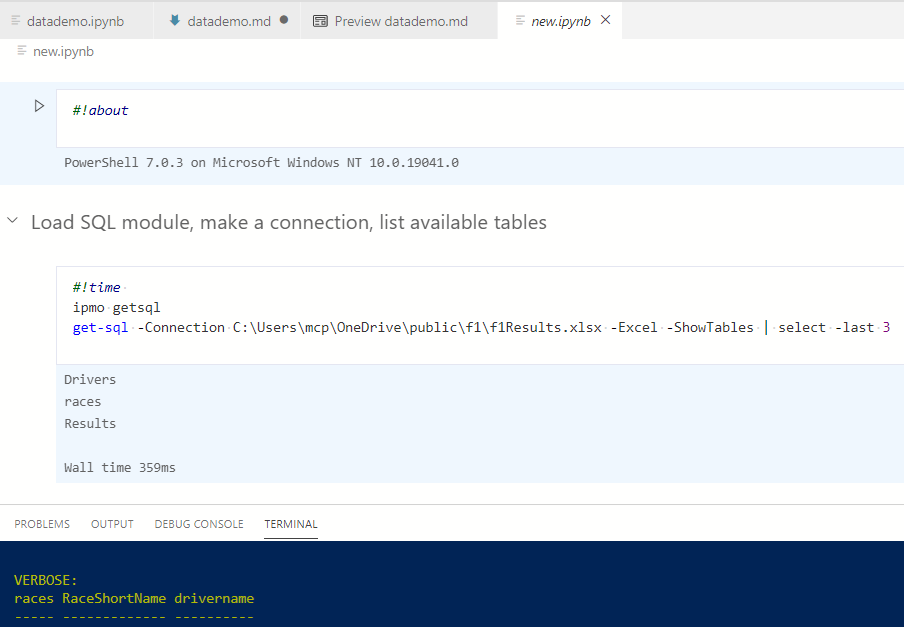
In the terminal window you can see some of the data which was displayed by
-verbose and which will be in the final cell of the notebook. At the top you can
see #about and #time have been processed and about shows the version of
PowerShell which ran the script.
But while I was writing I had one last idea. Doug uses a runspace. “Hmmm…” I thought “I can
connect to remote runspaces, so let’s add a -runspace option” and I got this:
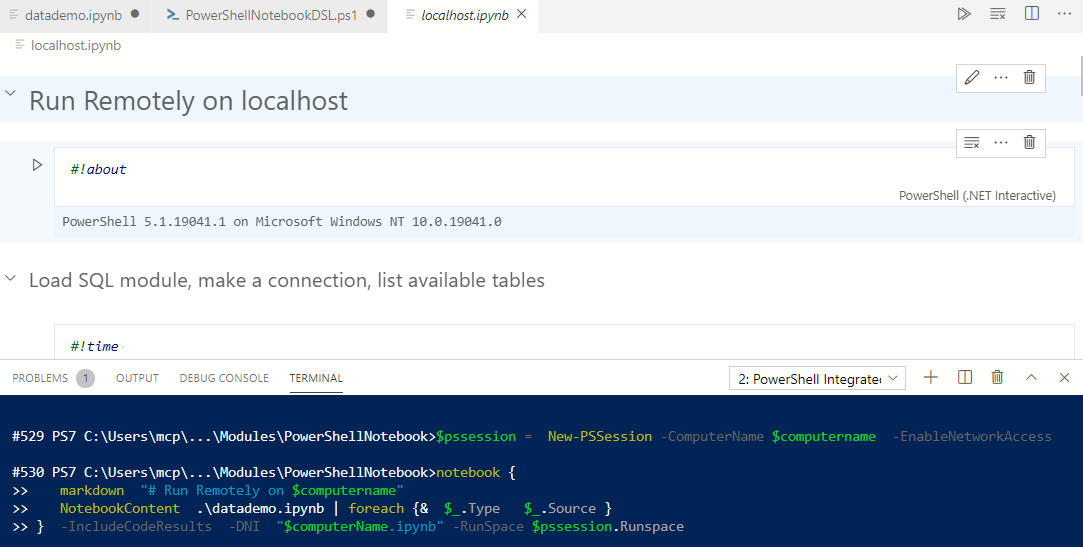
Again this is something I can see a lot of use for, download the notebook and run its code (with nothing more than standard PowerShell) and return the filled in notebook. How about doing that in parallel for many remote machines?